Sunday, October 2, 2016

Project 333 - the After

Last week I cleaned out my closet and took inventory. And I mean massive purge not just, "Oh I haven't worn this in a while." I followed the blog post "How to Finally Clean Out Your Closet for Good" as part of #project333. She really talks about the emotions of the project, and I was surprised to find that I felt nervous about it. Most of these clothes I have had for a long time. It wasn't because I *love* them but because I felt that I needed them. Or I might need them. And at one time, I did need them. But I committed myself to this project and laid it all out...literally...
THE BEFORE
Over 200 items collected over the course of 20 years. It's hard to believe that's even possible given that I barely go shopping. How did I get so much "stuff"?! Here's what I noticed, maybe you can relate. There were really four distinct "wardrobes" in my closet.
  1. Business Professional - What I wore when I worked in a law firm
  2. Mommy Wear - What I wore while pregnant and nursing (and beyond even though I shouldn't have)
  3. Business Casual - What I wore when I was teaching professionally
  4. Free/Clearance Items - What I wore when I was sick of Mommy Wear but too cheap to buy new clothes
Also, a random smattering of stuff I bought and really liked wearing but it probably wore out a decade ago. And about two dozen items purchased recently that I really like and kept. Seriously, that's about 24 out of 200+ items. Not good odds.

 THE AFTER
After 2 Rounds of "Clean Out" and one "Bonus Round" to create a Fall/Winter Capsule Wardrobe and a Spring/Summer Wardrobe, I had 120+ items to donate/swap, 45 items in the capsule wardrobes, and 71 items total in my closet.


BEFORE
AFTER
Total Items: 218
Total Items: 71
Less than 1% purchased in the last two years.
27 fall/winter items
Most of the items were 7+ years old.
18 spring/summer items
22 tank tops, 20 t-shirts
Extras – 16 specialty items
23 dresses
120+ items for donation/clothing swap
30+ items that need replacement due to wear
~30 items to alter or repurpose
16 pairs of shoes
10 pairs of shoes

I felt so good to let go of all the reasons I kept these items and focus on the present. However, at this point I really do not have enough items left to make a complete capsule wardrobe. Most of my "staple items" for Spring/Summer were either ill-fitting or worn out. And this is Texas, I still need a Spring/Summer Capsule Wardrobe for another month (and on occasion the whole year). The Fall/Winter Capsule Wardrobe, is nearly complete though since I actually did a good job shopping for it last year. (Thanks to my husband actually who told me to skip the sales racks and just buy what I needed.)

In the end this is my working list. Public note to self - you must replace these items. They're horrible, look at the reasons why again.

Clothing Replacement List
  • Winter coat (21 years old and looks like a Pizza Hut delivery jacket)
  • Capri pants (Holes, paint, ill-fitting hand-me-downs)
  • Black belt (It broke and you never replaced it)
  • White camisole (It hasn't really been white for a long while)
  • Sports bras - 3 (They were pre-baby and your chest is not)
  • Pencil skirt (Darts should not bubble up.)
  • Exercise pants - 3 (Lost their elasticity and they should ALL have pockets)
  • Summer skirt (Cheap stretch cotton pills horribly)
  • Sun dress - 2 (No stretch recovery, gaping arm holes, too long)
  • Robe (Bleach stained and ill-fitting)
  • Black fitted pants (Fit issues, all of them: too long, too short, low cut, stretch poly, short crotch)
  • Black cardigan (Pilling)
  • White cardigan (Is that so polyester it's shiny?!)
  • Keen everyday shoes (Holes)
  • Tennis shoes (Lack of tread)
  • Casual dress shoes (Blisters)
  • Tank tops - 3 (Arm holes too big, bleach stains, maternity does not fit you)
  • Casual lightweight pants - 3 (Holes, bleach stains, maternity does not fit you)

Slow Fashion October & the Capsule Project


A Simple Question


"Mom, who made this?"

- "Ummm...I don't know honey, someone in a factory."

"But who made it?"

- "I don't know who. [Checks the tag.] Someone in Indonesia."

"Where is that? I don't know where that is."

- [Thinking of a frame of reference for her.] "It's south of China."

"Oh, so like the Indian Ocean?"

- "Yes."

Gulp. I am so glad she has had enough items made for her in her life that she asks specifically about the person who made her clothing, but boy am I glad I didn't have to elaborate on the person in the factory who likely made this (admittedly cute) Circo brand robe from Target. In response, I did a quick search to see if I could find out anything on Circo brand factories or the industry in Indonesia as it relates to Target. Nope. I did find information on the industry in Bangladesh - largely because of the factory fires that made headline news and prompted some small measures of improvement for worker safety. (MPR News, Target) Most other information and media coverage has long since been buried as "old news" with little change made after the initial public outcry. It is noteworthy to me though that Target at least did something as opposed to most major retailers that chalk it up to the "human cost of business" and wait for the public outrage to pass. Sourcing clothing from ethical sources remains a difficult, time-consuming, and often expensive process.

The Capsule Wardrobe

I'm going to be honest - when I stumbled across the idea of a #capsulewardrobe the ethical implication of "fast fashion" and the retail clothing market were not on my mind. I don't fit the standard consumption categories of most American consumers so surely my wardrobe meets minimalist standards, right? I mean, my 7-year-old daughter just commented this morning that she doesn't even recall having been to a mall. But then I counted my closet - I have so much excess in my closet! But let's take another glimpse at this post on the Capsule Wardrobe - it's pretty selfish. It's not about anyone other than me. Look at what this change can do for me or for you. Isn't it fantastic for us? And that's great, self-care is important and I rarely do much of it, but when I looked closer - there's so much more to this idea and it can have a bigger impact. I can't change the regulations that govern international trade nor force foreign governments to protect people over profit - but I can make better choices about what to support with my decisions.


Fast Fashion

Last night, after my daughter asked me about her robe and who makes our clothes, I stumbled across "fast fashion" - the ever-increasing turn over of design and clothing in retail stores and the environmental impacts of such excessive consumption. Aside from the human cost, there is also an environmental impact that I honestly had never contemplated. What do you mean the average American throws away 68 pounds of clothing a year?! (HuffPost) But I don't throw away clothes, I donate them. I should feel good about that right? Kind of. "Most Americans are thoroughly convinced there is another person in their direct vicinity who truly needs and wants our unwanted clothes. This couldn’t be further from the truth." (Slate)

Most of the clothing donations in America are not resold locally and end up being collected for overseas sales or turned into rags. A fact that was confirmed by my own recent visit to our local charity organization. At the time it seemed like they were making great use of our donations by selling excess to a facility in Dallas that will ship them overseas or turn them into rags. But wait...what happens if they don't sell overseas? And what happens to the used rags? Oh...back to the landfill again. It's a vicious cycle. A cycle perpetuated by excess and consumerism.

Slow Fashion

"Don't just be a consumer." (Mission Church) I stole this line from my pastor this morning. No, he wasn't preaching about fashion or the clothing industry, but given my recent research the line resonated with me. Who do I want to be? Am I a #maker or a #consumer? What am I going to do as one, lone individual who wants to opt out of fast fashion? That's not much of a boycott. Thankfully, it's not just me.

This month there is a second annual movement going - #slowfashionoctober and over on Instagram I am going to join up with @slowfashionoctober that's headed by Karen over at the Fringe Association. She has already developed a Master Plan for the second annual event and given us a guideline for discussion and inspiration this month. And some more good information on the Why behind slow fashion.

Wednesday, September 21, 2016

A Capsule Wardrobe for Those Who Hate Shopping

The capsule wardrobe! It's a shopping diet - get rid of your habit, save yourself money, and break the cycle of consumerism that fuels low wage sweatshops! All of that reasoning is sound and admirable, but it isn't what attracted me to this idea. Confession time...

I hate shopping.

Especially clothing. I am overly frugal, difficult to fit, and have serious commitment issues (even to an article of clothing on a rack). Having been entirely absent from the fashion world since...well...most of my life (excepting 2000-2004, thanks to Carrie Bradshaw), I had never heard of a capsule wardrobe until two weeks ago. I mean, seriously, do you see my closet?! Well, no, you can't. Not really because there are too many items in there and they are so many different styles that it seems I have a multiple personality disorder. Trust me - it's a collection of hand-me-downs, clearance finds, and decade-old remnants of what used to be 'style'. I shop for clothes only when I reach a point of frustration that pushes me to do so. So, I am coming to this whole 'capsule wardrobe' idea from a different angle.

But before I get too far ahead of myself...


 What is a 'capsule wardrobe'? 

At its simplest - a capsule wardrobe is a small, mix and match wardrobe from which you can easily put together multiple outfits for an entire season. Beyond those principles the specifics vary widely. I stumbled across this whole idea through Project 333 and Un-fancy on Instagram so I am mostly (but not exactly) following their rules. Here are my personal guidelines with the differences noted under each rule:
  • Includes: 33-37 items, including clothing, accessories, outerwear and shoes.
Many people exclude shoes. I chose to include shoes because...confession time again...I am a former Shoe-a-holic. It used to be, back when stores carried small shoe sizes, that I had a rather large collection of shoes (think 50+ pairs). So in the interest of not relapsing on my shoe addiction, I am including shoes in my item count.
  • Excludes: underwear, sleep wear, and workout clothing 
Project 333 excludes "in-home lounge wear" but that's where I get in trouble as someone who works from home so I'm including it my item count. Otherwise I easily rotate through my four ill-fitting camo t-shirts in steady succession.
  • Rotate every 3-6 months.
Since I don't have any rotation of items and I don't shop on a regular basis the thought of rotating every 3 months actually causes me more stress rather than less. The point is to decrease stress but increase style so I'm giving myself some extra time to reevaluate and rotate items.
  • Make new items myself rather than buying them (excluding shoes and belts)
Part of the reason I hate shopping is that my body shape is so far off from ready-to-wear sizing that even if I find a clearance item that I like, it probably doesn't fit well. Sometimes it's an easy fix - like taking up straps or a hem (which I will likely forget to do until the time I want to wear the item). And I actually came across this whole 'capsule wardrobe' idea because I have started to invest more time into making my own clothes. This could prove disastrous - I have little experience making clothing for myself. Who knows? Follow along and find out. 

Why a 'capsule wardrobe'? 

Doesn't that create a flattering silhouette?
Since I work-from-home educating little people four days a week and then once a week I educate other people's children in an extremely relaxed environment; it is easy for me to get by wearing 'lounge wear' almost everyday. It doesn't happen on purpose - I am often so focused on getting everyone and everything else ready that I seriously forget about myself. All of a sudden it's now time to leave the house when I realize that I haven't looked in the mirror, brushed my hair, nor changed out of sleepwear. Nothing says "Take me seriously," like a ponytail, a free 5K race t-shirt, baggy bermuda-style shorts, and a worn out pair of keens.

Now, I will never be someone who has a meticulous, full-on morning routine of hair, make up, and a thoughtfully chosen outfit. It's just not who I am, but I would like to present myself to the world in something that doesn't say "Queen of Frumpy". Sure, I'm physically "comfortable" but I'm so under-dressed for life that I don't feel "comfortable." There has to be a middle ground between looking like I just rolled out of bed and runway couture.

How do I start a capsule wardrobe?

I have to admit - I am a bit intimidated by this process. Most of the inspiration and guidance out there is way more 'hip' and 'trendy' than I am, ever have been, or even seek to be. And...I've somehow made it well into my thirties without having a clear sense of style. Seriously, my Pinterest boards have multiple personality disorder when it comes to fashion. But I am starting here - a complete Wardrobe Inventory & Make Goals/Guiding Principles - and I'm blogging it out for the sake of mental clarity and accountability. Want to tag along? Join me here and on Instagram #CapsuleWardrobe2016

Friday, August 26, 2016

My Own Space - Craft Room Makeover

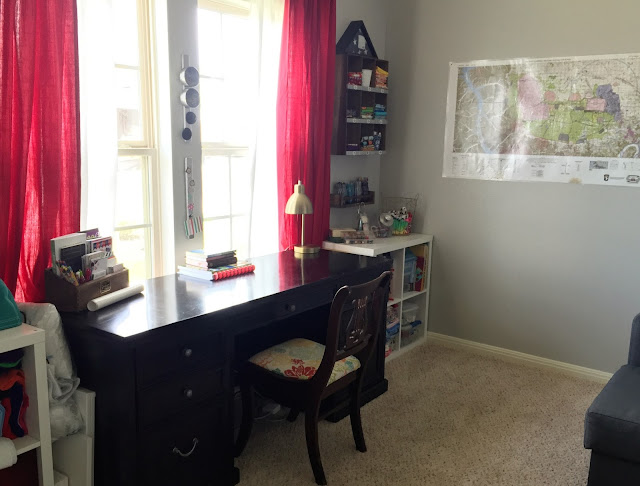
Over the past five years "my" space has steadily decreased. From a whole room and two large closets in 2010 to half a closet and a spare table by 2012, then a dozen boxes in a storage unit for 2014, to a shared dining room space in 2015, to here...half a room to myself. When we moved into this house we knew the front 'office' would be a guest space, but my husband (sweet soul that he is) suggested that I take the other half of the room for a Space of My Own. It's likely he didn't want to share the dining room table with a cutting mat, a tangle of fabric, and a sewing machine anymore. Regardless, I took him at his word and moved my stuff into the front room. Then made it my own by creating a big ol' mess. Sacks of papers, stacks of books, jars of pens that constantly were knocked over, trash can next to my chair, and boxes on all sides of me. For almost six months. Until I just couldn't take it anymore.


The theme of the room is red, white, and blue but not in a "hey let's paint this wall to replicate the American flag" sort of way. Rather, a place to display Army stuff and the items I have collected from friends and family and all our travels. I joke that it's probably the most masculine craft space ever created - Texas Rangers, Army maps, and (not pictured) a Special Forces tribute award on the opposite wall - but to me, it's perfect. I started withe the flag my husband flew for my in Iraq when he missed my college graduation, then added one of our Army maps. I have some WWII maps of Europe, a map from deployment, and some from random travels to get up there soon too.

Functionally, everything needed a place. But more than that, it needed a place that I didn't have to move a bookcase, six boxes, and undo three pouches to get to an item. Between hand-me-downs and trips to Ikea and/or Target - I was able to accomplish a good balance between open and closed storage.
Forgive the BRIGHT but there's not really any in between for picture-taking in this room. Either the curtains are open and it's bright white or they're closed and it glows disturbingly red. The windows though, are the best thing about this space. Especially right now since the neighborhood isn't built out yet and I can still see over to the farmland across the county road. The kids and I also have a bird feeder on one of the trees in our front yard, though the birds around here devour seed so quickly that it's hard to keep it full. They're fun to watch, especially during early morning devotions.
These cork boards are my favorite DIY project of this whole room. Gold spray paint and stencils really took some $5 Ikea cork boards up a notch. And again, patriotic without being IN YOUR FACE about it. But my favorite parts of the room are in the details...like having a place for my Great-Grandmother's sewing notions that were passed along to me.

Wednesday, August 24, 2016

Gathered Skirt with Pockets

Two projects in one week after maybe two projects in a year - say what?! I know...it's awesome. I'd say my Sewing Mojo is back but I don't want to jinx it. It began when we made (hopefully) our final move of the past two years and my husband told me to take our front room as a craft space. I'll skip over the rest, but when I unpacked what little I kept of my fabric stash I came across this fabric from the 2012 Lisette by Leisl + Co in my stash since, well, 2012. I loved the whole collection that year and went so far as to make both my daughter's Easter dress and a dress for myself from that collection. I really liked it still but I couldn't figure out what to do with it. I washed it, ironed it, hung it, and then stared at it for a few days while searching online for help...
I learned the hard way that most mistakes in sewing women's apparel come from poor fabric choice. I didn't want this fabric that I loved to be ruined by pairing it with the wrong pattern. I was pretty sure that with such a small print I wanted it to be a 'bottom' of some kind. A couple of my fabulous sewing friends suggested pairing it with a solid for a dress for my daughter, but...I really wanted this fabric for myself (selfish, I know), but the idea of pairing the small print with a solid to break it up stuck with me. And I discovered that I had a nice semi-solid print already in my stash. After the Summer Romper I made for my daughter from Purl Soho, I was looking at all their free tutorials and stumbled upon just the right project. 

Gathered Skirt for All Ages
Pattern: Gathered Skirt for All Ages 

The Before: This pattern has mostly been used in the girls' sizes. I found only one existing review of the skirt having been made in a women's size and she declared her desire for a less full skirt. Personally, I like a full skirt so I didn't change the standard 2.5 waist ratio. If you don't like so much flounce...decrease the width of the panels, just make sure you have enough room to get it past your hips. Otherwise, the only pattern alteration was to shorten the length a few inches to fit my petite stature and get more use from my mere 2 yards of fabric.

The During: I decided to top stitch the pockets. I contemplated not edge-stitching along the side of the pockets but decided since it was white stitching atop mostly white fabric it wouldn't stand out as it did in the tutorial pictures.  The waist elastic...I had to fiddle with that bit, a lot, until it finally stayed put where I wanted it on my body, but that will be different for every single woman. And I know a lot of people who look down on the elastic waist but, it's so simple to install and so forgiving when your waist size fluctuates so often. Plus, I'm out of zippers at the moment.

The Future: I will probably do french seams on the side panels and leave off the edge stitching. And I will shorten the pockets along with the overall length. They're about an inch too deep for my short arms. I just didn't think about that possibility when I shortened the main panels.

Is it the most elegant skirt ever? No. But that's not what drew me to the pattern. It's the pockets. POCKETS! Oh the utility of this skirt! For me, it's a perfect departure from the 7-year-old much worn sweat-shorts that were a postpartum solution to my wardrobe woes. I paired it simply with a matching tank top, dropped my phone into one pocket, my keys to the other, and then I was off to the store (literally...we needed dog food and groceries).

The Outtakes: When your photographer isn't a photographer and you aren't a model
It gets interesting...and a bit frustrating.


Sunday, August 21, 2016

Shopkins Summer Romper

I am so proud of this girl. She wanted a romper, but we were behind the trend so by the time we went shopping for one, they were hard to find. We finally found two options at Justice but they didn't fit the best and her favorite of the two was still $20 on clearance. That was her entire budget for a Back to School (or Homeschool in our case) outfit. I told her that if she wanted, I would find a pattern and she could choose the fabric then we could make her a romper. You see before you her choice. She found a $10 (super-comfy-wish-it-came-in-my-size) dress at Old Navy, $7 for fabric at Jo-Ann's, and a FREE pattern from Purl Soho - under budget!

I was so excited to find the FREE Summer Romper for Kids pattern from Purl Soho so I could fulfill her request. Personally, I wouldn't have picked a novelty Shopkins fabric, but this was her romper so I left it up to her. The medium-weight woven cotton felt a little stiff for all the gathers and the width, but it worked out fine. I think the pattern would work up better in something with more drape and it would look more like the rompers she found in the store that she really liked.

Starting alterations: Lengthen the inseam on the shorts. Like A LOT - 3.5" actually. My girl is used to wearing Bermuda length shorts so I used her shorts as a guide. Next time around I will probably only lengthen it by 2' though and use a much lighter weight fabric so it appears more like a skirted romper than shorts. She has requested that I narrow the shorts on this romper, which will probably work out better with the fabric choice.

During alterations: the elastic measurements. We made a 6-7 size for her waist measurement but the elastic length given for that size was way too long for her actual waist. I had her try it on and we adjusted the elastic length specific to her size - always a good idea. Same for the chest/back elastic. She's a petite girl and we used the elastic length for a full size smaller.

Future alternations: The arm holes weren't quite deep enough for her arms once I folded over so much of the top for the elastic casing. I haven't decided yet if I will change the hem for the casing or just lengthen the top to allow for this adjustment. My daughter likes her neckline pretty high up, if your child isn't too picky about where the neckline hits then it may not be an issue.

My humble opinion: It's a GREAT pattern, especially for FREE. Easy to follow, and for me, it was a great re-introduction to sewing clothing. There are a few non-beginner tasks included though so I would not recommend it as a first project.

Thursday, April 28, 2016

Daily and Weekly Tasks list for the Happy Planner side bar

https://drive.google.com/file/d/0B1lFFb5RLCVARlNqdVdrUlN6WjQ/view?usp=sharing
Before I started using the Happy Planner from MAMBI, I was using a free printable from the Internet to manage household chores, daily tasks, meal planning, and To Do lists. I looked into the option of printing it and having it bound but the cost of doing so was just as much or more, than buying a planner on sale. I was honestly torn though because I really liked the layout of the daily tasks and weekly chores. For awhile I searched for something to replicate it but found that to be an annoying and futile search. So...I made my own.


Then I posted to Instagram and Facebook and it seems like I'm not the only one who likes this format. And since so many people have shared their work for free with me (and countless others), it seemed only right to Pay It Forward. On that note, I'm not a graphic design professional (unfortunately). It's not my profession and I do not own professional software, so if things don't work perfectly for you then I do apologize.


I changed the lists to match the planner days of the week which run from Monday-Sunday instead of Sunday-Saturday as they were previously. It was driving me crazy!


Each picture is linked to a PDF that on my printer prints such that it is exactly the size of the Happy Planner side bar in the weekly spread if you trim it really, really close to the dotted border. The other option is to right click on the picture, save as image, then put it into a Word Document - which is how I created the PDF. I was able to fit four lists per page using narrow half-inch margins.


https://drive.google.com/file/d/0B1lFFb5RLCVAWGNsZzJiTXRzUnc/view?usp=sharing
I posted the blank option with roomier lines in case you would like to write in them after printing. The partially filled option has narrower lines since you do not need to write in as much information. The PDFs do not have "fillable" blanks because I do not have that capability with my free Adobe software. (If there's a way to create such a function with the free software please let me know.) However, inside the PDF you should be able to use the Add Text function to type directly onto either version. 


If the lists work well for you, let me know and I will add more colors as the months go on and I get bored.


Now, just because I'm not currently running a professional design business does not mean my items aren't copyrighted. And I hate to have to address this problem but when I was running an Etsy shop...I saw it all too often. Please don't swipe these and hold them out as your own, charge other people for them, or steal them for your website or blog. It's rude, unnecessary, and illegal. I got my inspiration from another free printable but it is not the same content, layout, or design. Basically only the idea of filing in the bubbles for each day is the same.

Hope these work out well for you all!

Monday, April 25, 2016

Dollar Shave Club Review

Years ago, I stopped paying "pink tax" and couponers were raging about how there are always coupons to get free (or nearly free) razors. And let me tell you...there's a reason those razors are free. My choices seemed to be "high priced, decent quality" or "low priced, low quality" razors. Neither option was really appealing, so I streeeeeetched my razor blades as long as I could and streeeeeetched out how long I went between shaves too. BUT...that's not comfortable on so many levels. AND...I live in Texas now, where the shaving season is much, much longer than when we lived in Iowa. SO...it was time to figure out something better.

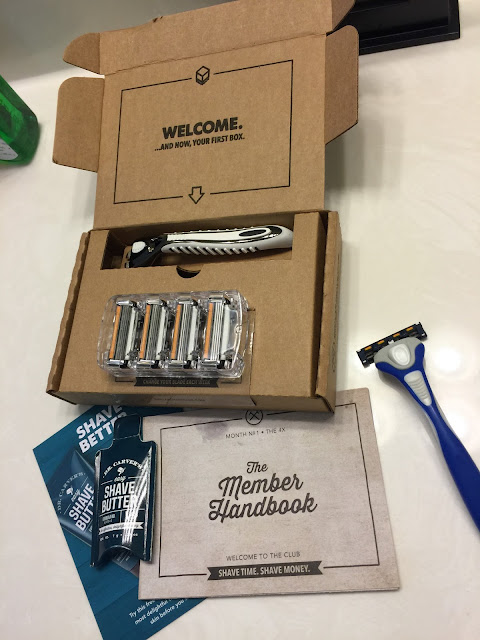
I started to give Dollar Shave Club a shot when they first came out but didn't. I didn't really believe the razors would be any better. Then a couple months ago my dear husband had to start shaving daily again and signed himself up. He chose their cheapest level, the Humble Twin, because he has always preferred the two blade razors. He gave it a good review, along with the shave butter. I looked at his razor (that blue handle in the picture below). I was skeptical. It sure didn't look like it could navigate ankles and knees and pits...

So I did what I always do...I googled for reviews. Reviews from women. There weren't many and among the few I found many were just an unboxing. I don't care about what comes in the box, how fun the little paper pamphlet is, or how clever the marketing slogans are - how does it work? Does it shave well? Which razor did you choose? And how does the razor hold up? Is it really necessary to change it every. single. week. like DSC recommends? But I did find a few reviews that were positive so I decided to give DSC a shot, then add my experience should any other women want to try it too.

http://shaved.by/dL3XP

  • Which razor? I chose the 4X. It seemed to be what was recommended "for your lover" (seriously DSC?) and what other women had selected. It was also the most comparable to my preferred razors of the past. I do like it better than my husband's Humble Twin. The handle has more weight to it and it flexes better.
  • Does it shave well? Yes. And about a million times better than the cheapo razors (which had a similar cost even with a coupon). No multiple swipes or nicks or clogged razor.
  • How does it hold up? I have used the same blade every 2-3 days for almost 2 weeks and it's probably time to change out. I could probably change it sooner or keep pushing it for another week without major discomfort. I figure that after a few every other month deliveries I will be stocked up for awhile and can discontinue my plan for awhile.
  • What about that shave butter? I really, really did not want to like it. It's pricey when you're talking about using enough to shave your legs. Personally though I can't use shaving cream - not the cheap stuff, not the "pink tax" stuff, none of it - it gives me a rash every time. So I tried the butter on one leg and compared it to conditioner on the other leg. The butter worked better, period. Easier glide, less clogging, fewer left behind hairs, it did its job well and didn't give me a rash. The fact that I like the shave butter (but not its cost) is making me looking also at Harry's since their prices are comparable once you add in the shave butter but their razors are (supposedly) better quality than DSC. You can expect a Harry's review post in the future.
Anything else you want to know? Comment and ask me.
*Full Disclosure: I have not been compensated in any way for my post, however I do include a referral link in this post.

Friday, April 22, 2016

Planner Newbie - The Happy Planner from MAMBI 2016-2017

After finishing graduate school, my husband and I changing jobs a couple of times, living in four different houses in less than two years, and moving to a new state...we may finally be settling down. We are all very grateful for the changes, but even more grateful for some stability. Somewhere in all those changes my brain has become rather glitchy - if I don't write it down then I won't remember it. Recently I realized that even though I was recording things, I was doing so in four or five different places so it wasn't uncommon for me to lose the grocery list or miss a reminder about an appointment or forget where I put that note. So I went searching for a planner, a real, tangible, write-it-down with a pencil, planner - and I found out that things have changed drastically since I last used one, about a decade ago. There are so many options and so many PRETTY options!

I won't say how much time and energy went into the hunt for the "perfect" planner, but in the end - I didn't get it right. I wanted one planner to do EVERYTHING I needed and really - that wasn't necessary nor feasible. I first bought a personal size Color Crush from Webster's Pages hoping that I could use it for both money management (envelope budget system) and household planning, but the reality for me was that the weekly pages just weren't big enough for household planning. They'll hold a few appointments or a shopping list but not full checklist of chores and tasks and appointments and reminders that I need in order to stay on top of things. So I decided to split the job of household management between the Color Crush and this little beauty that I came across at Michael's - the Happy Planner in Fresh Floral from MAMBI.

http://shop.meandmybigideas.com/collections/create-365 

Isn't she pretty? There are 10 style options of the Classic Planner 
if all the flowers aren't your style and specific Student and Teacher editions. 

And look how cute - there are even hearts on the discs! 

 So why did I chose the Happy Planner over, say, Erin Condren or Plum Papers?
  • Local availability - The line is carried at both Hobby Lobby and Michael's - which means I totally used coupons to make the purchase. (Because I'm frugal and I want to stretch my pennies.)
  • Easily customized - Both with extension packs and Internet printables. Almost every brand has extensions and printables available online but I don't want to have to rely on printing things (my printer isn't very reliable) nor wait for things to ship (because I'm impatient like that). Also, the disc bound system makes extras easy to add/move/remove.
  • Undated Calendar Extension pack - The available 6 month undated extension pack meant I could start using it right away and keep using it until 2017, for the same price as a 12 month planner bought online that didn't start until July.  And the pack came with sticker pages to help date those suckers so I didn't have to go hunting for stamps or buying more pieces to make them work.
  • Fitness, Household, and Recipe options - When time and budget allow I think these extension will be fun and useful.
  • Layout - It isn't drastically different than the competition but the weekly spreads were set up in a way so that I can plan household in the side bar, homeschool in the mornings, and everything else in the afternoon/evening blocks.
  • Design - The aesthetics appealed to me. If I'm looking at this thing everyday then it's about both form and function. I'm honestly not going to use it as much if it's clunky and ugly.
So what's it look like inside? Check it out.
The beginning...so sweet and a bit "girlie", but it made me smile. 

 
My favorite part - the weekly spreads.