Wednesday, February 23, 2011

Free Motion Quilting

My interest in free-motion quilting began this past summer with this post at Craft Apple.  Then this fall, several of my friends learned the technique.  And when I saw this beautiful bib posted by my friend, Quirky Granola Girl, I just had to learn for myself.
I started by asking her (and a few others) some questions.  Then I watched a few tutorials - Craft AppleCrazy Mom Quilts, and (of course) Oh, Fransson!  I laughed when I saw the speed with which these women can quilt.  Rest assured, if you are like me, there is no need to go that fast.  And the first attempt, it probably won't be pretty, see? 

First Attempt
 But don't sweat it, because it will get better.  And if you have questions, there are tons of people out there willing to help.  Crafters/Knitters/Quilters - we're a generally friendly bunch.
Second Attempt
And then we you get up the nerve - start your first project.  For me, once I had the groove down, I had to keep going.  It takes me a while to warm-up before I can get going again.
First Project

Monday, February 21, 2011

Smallcakes

It is a New Year's goal of mine to try at least one local restaurant or bakery each month.  Not a huge goal, but we tend not to eat out very often.  For February, we made it a family event - one place for each of us.  First, we were off to Monkey Bizness for Lil' Hoot.  Then, we ate at Oklahoma Joe's - a favorite of Big Hoot.  And our final stop, Smallcakes was just for me.

Smallcakes came to my attention through Cupcake Wars on the Food Network.  (I tend to be a bit of a Food Network junkie.)  In their first appearance on the show Owner/Baker Jeff Martin admitted to the judges that a flavor was forgotten.  While his honesty was admired, he was sent home.  The appearance gathered him local fame and the news piece caught my attention.  And I am always on the look out for a good cupcake. 

Forgive my poor photos but I just couldn't wait until morning to bust open the box.  Aren't they pretty?


And the breakdown of contents, starting at top left:

My cupcake - Drum Stick
Classic vanilla cake
topped with both fudge icing
and vanilla buttercream
drizzled with caramel & a few nuts
Big Hoot's cupcake - Choc-o-holic
Classic chocolate cake
topped with chocolate buttercream 

Lil Hoot's Cupcake - The Hostess
Chocolate Cake filled with vanilla buttercream, topped with fudge icing

The Reviews:

Lil Hoot cried when we split her cupcake in half.  She loved it so much, she couldn't bear to part with even a piece of it.  (Note to parents:  Always split the cupcake in half when it's out of sight, then give only the half from the beginning.  Duh.) 

Big Hoot scarfed his cupcake down and deemed it, "Delectable."

Mama Hoot - I loved the cake and the fudge icing, but the buttercream is a bit sweet for me.  I will certainly have one again though.

Friday, February 18, 2011

Quilting Bee Blocks

As I mentioned before, I am currently part of a virtual quilting bee.  We started back in October and here is a walk through our blocks.  I am loving learning new techniques and taking them with me into my products.

January's Block - String Quilt

October's Block - String Quilt

November's Block - Anna's Design

Monday, January 31, 2011

Studio Reorganization

Some how, after every project, my studio is an overwhelming disaster.  I knew after the holidays were over that I needed to find a solution.  I cannot work in chaos, it sucks the life right out of me.  So here's what I started with:


I'm pretty embarressed to even admit to these photos, but it's the truth.  It just wasn't working for me.  So I cleaned out and reorganized.

 I started with my closets.  I couldn't see what I had so I ended up dragging it all out into my work space and digging through it.  I pulled out all my fabric and separated it by type and color.  Then I organized my scraps the same way, using the ziplock bags and bins to hold them.  Same for ribbons, bias tapes, etc.  I used an old embroidery floss box to separate buttons.  The large boxes at the bottom of one closet hold yards of apparel fabric that are waiting for the some day that I need them.  As well as clothing that waits to be repurposed.


And I cleaned out all the rest of my shelves, getting rid of anything without purpose.  I rearranged so that I can use the extra boards and shelves from our garage and we don't have to buy anything new.  I now use the shelves beneath my cutting table to hold completed orders that need to be shipped and current projects (and their supplies).

So far, so good - my studio is working much better.  Even when I do make a mess, it's faster to clean up.  Of course, it also takes some discipline to put things away as soon as I am done with them rather than thinking to myself, "I'll pick it all up at the end." 

Thursday, January 27, 2011

Quilt Block Tutorial - Disappearing 9 Patch Variation

Before I begin, allow me to caveat this tutorial by saying that I am not an experienced quilter.  I just started doing some quilting this Fall, encouraged by my friends who started a virtual quilting bee for our group.  My month is February and this is my block.  I wanted something perfect for using up scraps and stash fabric.

I started with the idea of a typical Disappearing 9 Patch but then made the following changes:

  1. Cut the following pieces from scraps and stash fabrics.  This block can also be made from a charm pack of fabric.
          16 - 2.5" x 2.5" squares
            5 - 4.5" x 4.5" squares

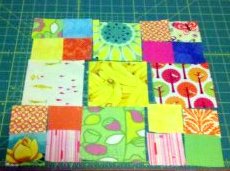
2.  Arrange squares to your liking.

 3.  Sew the 2.5" x 2.5" squares as shown.  Press seams open.

 4.  Sew the two rectangles together to form a 4.25" x 4.25" square.  Press seams open. 
*I don't use pins often, so to keep my corners lined up I start sewing approximately at the arrow in order to keep them lined up.  Then I flip the fabric and finish the seam.  That's probably cheating and many people would probably argue that pins would be faster, but it's the easiest way for me.  Even with pins I still end up with mismatched corners.

 5.  Your corner squares are complete.

 6.  Sew the 4.5" squares into three rows as shown.  Press seams open.

 7.  Sew all three rows together to form a complete square.  Press flat.

 8.  Cut apart along center lines. 

At this point a friend of mine pointed out how the cutting does not allow for seams when either sewing the blocks together again or when sashing into the quilt top.  So the symmetry is lost as noted in the picture below.


So here are two ways to create a symmetrical block.  First, by using smaller scraps to create individual blocks.

 1.  Cut the following:
       5 - 2.5" x 2.5" squares
       2 - 2.5" x 4.5" rectangles

 2.  Sew 2.5" squares as shown previously.  Then sew as shown above.  Press seams open.

 3.  Sew the two rows together as shown above.  Press flat.  You will now have a 6.5" x 6.5" square.

And now the second method for a symmetrical square using the Disappearing 9 Patch tutorial.

Rather than cutting 4.5" x 4.5" squares, cut the following:

2 - 4.5"W x 5"H (A)
2 - 5"H x 4.5"W (B)
1 - 5"H x 5"W (C)

Assemble the pieces in accordance with the chart above and sew according to the tutorial.  You will end with four 6.5" x 6.5" squares.