Friday, August 26, 2016

My Own Space - Craft Room Makeover

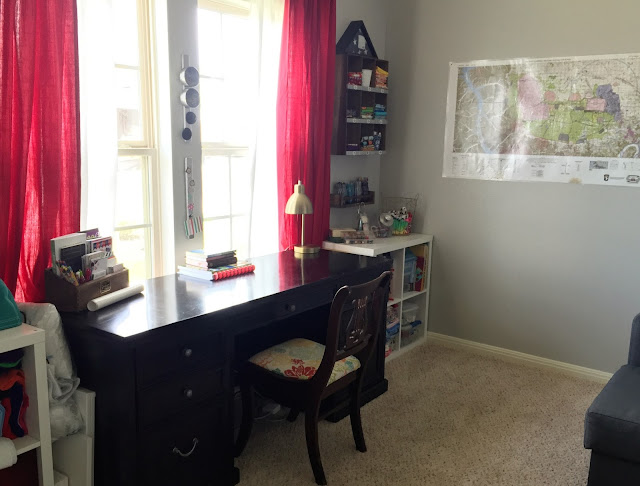
Over the past five years "my" space has steadily decreased. From a whole room and two large closets in 2010 to half a closet and a spare table by 2012, then a dozen boxes in a storage unit for 2014, to a shared dining room space in 2015, to here...half a room to myself. When we moved into this house we knew the front 'office' would be a guest space, but my husband (sweet soul that he is) suggested that I take the other half of the room for a Space of My Own. It's likely he didn't want to share the dining room table with a cutting mat, a tangle of fabric, and a sewing machine anymore. Regardless, I took him at his word and moved my stuff into the front room. Then made it my own by creating a big ol' mess. Sacks of papers, stacks of books, jars of pens that constantly were knocked over, trash can next to my chair, and boxes on all sides of me. For almost six months. Until I just couldn't take it anymore.


The theme of the room is red, white, and blue but not in a "hey let's paint this wall to replicate the American flag" sort of way. Rather, a place to display Army stuff and the items I have collected from friends and family and all our travels. I joke that it's probably the most masculine craft space ever created - Texas Rangers, Army maps, and (not pictured) a Special Forces tribute award on the opposite wall - but to me, it's perfect. I started withe the flag my husband flew for my in Iraq when he missed my college graduation, then added one of our Army maps. I have some WWII maps of Europe, a map from deployment, and some from random travels to get up there soon too.

Functionally, everything needed a place. But more than that, it needed a place that I didn't have to move a bookcase, six boxes, and undo three pouches to get to an item. Between hand-me-downs and trips to Ikea and/or Target - I was able to accomplish a good balance between open and closed storage.
Forgive the BRIGHT but there's not really any in between for picture-taking in this room. Either the curtains are open and it's bright white or they're closed and it glows disturbingly red. The windows though, are the best thing about this space. Especially right now since the neighborhood isn't built out yet and I can still see over to the farmland across the county road. The kids and I also have a bird feeder on one of the trees in our front yard, though the birds around here devour seed so quickly that it's hard to keep it full. They're fun to watch, especially during early morning devotions.
These cork boards are my favorite DIY project of this whole room. Gold spray paint and stencils really took some $5 Ikea cork boards up a notch. And again, patriotic without being IN YOUR FACE about it. But my favorite parts of the room are in the details...like having a place for my Great-Grandmother's sewing notions that were passed along to me.
Wednesday, August 24, 2016

Gathered Skirt with Pockets

Two projects in one week after maybe two projects in a year - say what?! I know...it's awesome. I'd say my Sewing Mojo is back but I don't want to jinx it. It began when we made (hopefully) our final move of the past two years and my husband told me to take our front room as a craft space. I'll skip over the rest, but when I unpacked what little I kept of my fabric stash I came across this fabric from the 2012 Lisette by Leisl + Co in my stash since, well, 2012. I loved the whole collection that year and went so far as to make both my daughter's Easter dress and a dress for myself from that collection. I really liked it still but I couldn't figure out what to do with it. I washed it, ironed it, hung it, and then stared at it for a few days while searching online for help...
I learned the hard way that most mistakes in sewing women's apparel come from poor fabric choice. I didn't want this fabric that I loved to be ruined by pairing it with the wrong pattern. I was pretty sure that with such a small print I wanted it to be a 'bottom' of some kind. A couple of my fabulous sewing friends suggested pairing it with a solid for a dress for my daughter, but...I really wanted this fabric for myself (selfish, I know), but the idea of pairing the small print with a solid to break it up stuck with me. And I discovered that I had a nice semi-solid print already in my stash. After the Summer Romper I made for my daughter from Purl Soho, I was looking at all their free tutorials and stumbled upon just the right project. 

Gathered Skirt for All Ages
Pattern: Gathered Skirt for All Ages 

The Before: This pattern has mostly been used in the girls' sizes. I found only one existing review of the skirt having been made in a women's size and she declared her desire for a less full skirt. Personally, I like a full skirt so I didn't change the standard 2.5 waist ratio. If you don't like so much flounce...decrease the width of the panels, just make sure you have enough room to get it past your hips. Otherwise, the only pattern alteration was to shorten the length a few inches to fit my petite stature and get more use from my mere 2 yards of fabric.

The During: I decided to top stitch the pockets. I contemplated not edge-stitching along the side of the pockets but decided since it was white stitching atop mostly white fabric it wouldn't stand out as it did in the tutorial pictures.  The waist elastic...I had to fiddle with that bit, a lot, until it finally stayed put where I wanted it on my body, but that will be different for every single woman. And I know a lot of people who look down on the elastic waist but, it's so simple to install and so forgiving when your waist size fluctuates so often. Plus, I'm out of zippers at the moment.

The Future: I will probably do french seams on the side panels and leave off the edge stitching. And I will shorten the pockets along with the overall length. They're about an inch too deep for my short arms. I just didn't think about that possibility when I shortened the main panels.

Is it the most elegant skirt ever? No. But that's not what drew me to the pattern. It's the pockets. POCKETS! Oh the utility of this skirt! For me, it's a perfect departure from the 7-year-old much worn sweat-shorts that were a postpartum solution to my wardrobe woes. I paired it simply with a matching tank top, dropped my phone into one pocket, my keys to the other, and then I was off to the store (literally...we needed dog food and groceries).

The Outtakes: When your photographer isn't a photographer and you aren't a model
It gets interesting...and a bit frustrating.


Sunday, August 21, 2016

Shopkins Summer Romper

I am so proud of this girl. She wanted a romper, but we were behind the trend so by the time we went shopping for one, they were hard to find. We finally found two options at Justice but they didn't fit the best and her favorite of the two was still $20 on clearance. That was her entire budget for a Back to School (or Homeschool in our case) outfit. I told her that if she wanted, I would find a pattern and she could choose the fabric then we could make her a romper. You see before you her choice. She found a $10 (super-comfy-wish-it-came-in-my-size) dress at Old Navy, $7 for fabric at Jo-Ann's, and a FREE pattern from Purl Soho - under budget!

I was so excited to find the FREE Summer Romper for Kids pattern from Purl Soho so I could fulfill her request. Personally, I wouldn't have picked a novelty Shopkins fabric, but this was her romper so I left it up to her. The medium-weight woven cotton felt a little stiff for all the gathers and the width, but it worked out fine. I think the pattern would work up better in something with more drape and it would look more like the rompers she found in the store that she really liked.

Starting alterations: Lengthen the inseam on the shorts. Like A LOT - 3.5" actually. My girl is used to wearing Bermuda length shorts so I used her shorts as a guide. Next time around I will probably only lengthen it by 2' though and use a much lighter weight fabric so it appears more like a skirted romper than shorts. She has requested that I narrow the shorts on this romper, which will probably work out better with the fabric choice.

During alterations: the elastic measurements. We made a 6-7 size for her waist measurement but the elastic length given for that size was way too long for her actual waist. I had her try it on and we adjusted the elastic length specific to her size - always a good idea. Same for the chest/back elastic. She's a petite girl and we used the elastic length for a full size smaller.

Future alternations: The arm holes weren't quite deep enough for her arms once I folded over so much of the top for the elastic casing. I haven't decided yet if I will change the hem for the casing or just lengthen the top to allow for this adjustment. My daughter likes her neckline pretty high up, if your child isn't too picky about where the neckline hits then it may not be an issue.

My humble opinion: It's a GREAT pattern, especially for FREE. Easy to follow, and for me, it was a great re-introduction to sewing clothing. There are a few non-beginner tasks included though so I would not recommend it as a first project.