Showing posts with label quilting. Show all posts

Monday, February 16, 2015

I Spy Quilt

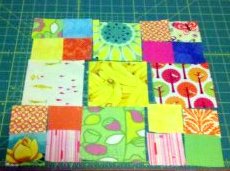
Finally!  It's finally done. I had forgotten how long quilting takes.  It's really more for process people.  I think I will commit myself only to quilting for dolls or pillows in the future.  (Remind me of this when I forget.)  It's certainly not perfect, but my children enjoy it and it serves its purpose.  For this entire year I made a commitment to use as much as possible from my stash.  The sashing, binding, batting, and backing all came from my stash.  Slowly but surely I am reclaiming storage space.


For the backing I used some leftover flannel and minky.  I don't think I will ever try that again.  It bunched and pulled and wiggled.  In the end it worked out fine but just wasn't as pretty as I like.

I know in my last sewing post I promised give-aways.  Between quilting and bringing our daughter home for school I haven't had as much time for stash reduction as I wanted.  Stay tuned and in the next few weeks I have many fun things to share and give away for both homeschool and crafts.

Saturday, January 3, 2015

I'm Back Baby!


What better way to re-start the blog than with Friends?!

That's right I'm officially back from my graduate school hiatus...and renovating a house, and selling it, and moving - twice.  One thing I learned from moving twice within six months is that I had too much junk for my hobbies.  And too many hobbies.  I had a bag of stuff for jewelry, a 4 drawer tote of scrapbooking supplies, box after box of fabric, a tote and a half of yarn, a box of items to eventually upcycled, a box of doomed Unfinished Objects, the list could go on.  I paired it down once when I first packed up while staging the house, then again when we packed up the storage unit, and again when we repacked the storage unit.  I thought I got rid of lots of stuff.  

Then, we unpacked at our final destination and I still had almost a dozen boxes (of various sizes) of "stuff".  I fit most of it into my allotted craft storage space, but I'm still overflowing by two totes and a large bag of stuffing/foam.  So here's my plan:
  1. Tackle the items in my "Fix It" pile
  2. Complete planned projects
  3. Use my stash to make fun items to GIVE AWAY
So...coming soon I will post pictures and then you guys can claim it.  If you need me to ship it, all you pay is cost of shipping (which should be $5 or less, nothing larger than a Priority mail flat rate envelope is planned).  I get to keep creating and my end products get a place to be loved.  I consider that a win-win.  Anything you recommend I try?  I have tons of fleece and felt.

Right now - I am practicing (and I need a lot of practice) paper piecing so I can make some fun pillows with that large bag of stuffing/foam.  And finally using all the fun fabrics I've been collecting for (literally) years for an I-Spy quilt for the kids (before they outgrow thinking it's fun).  Grace helped me pick out some of the fabrics, lay them out, and move them all around into a pattern. To those of you who donated fabric or allowed me to purchase some of your scraps for the I-Spy quilt - THANK YOU!  Please let me return the favor soon.

 The five pointed star is giving me fits on the last seam - any body have tips?

It kills me a little bit that it's so random, but I could have spent hours debating and arranging. I am truly grateful that Grace was so helpful and decisive in her choices. 

Friday, September 23, 2011

Lil Hoot's New Room - The Quilt

Remember back a year and a half ago when I started painting Lil' Hoot's new room? No? Really? Well, about a year after I finished painting the room she finally moved in. I got a bright idea that I should make the quilt for her bed. Yep, my first whole quilt and I decided to make it a twin-size quilt. (Seriously, what was I thinking?!) I took months trying to decide on a fabric and really have my friends to thank for picking Central Park by Kate Spain. I fell in love with the fabric and then found that certain blues matched perfectly with the walls - yeah!

2011-09-01_08-22-28_386

Of course, I couldn't find a pattern that I liked so I complicated things even further by designing my own. I was inspired by this quilt back that I found on Flickr. I ordered a layer cake and got started. It was a simple top to piece together, but don't look too close. I'm not a perfectionist. :-)
Quilt Top under construction

Quilt Top pieced 1

2011-08-21_12-08-21_570
I did my best to quilt it by stitch-in-ditch but without a walking foot it was a challenge, so don't look too close there either.

2011-08-21_12-09-01_845

I pieced the back with some of the squares from my May Moms quilt bee. (Thanks ladies!)

2011-09-01_08-23-06_790
I also added a little dedication for my girl. I hope the quilt becomes an heirloom for her.

Her whole room was then built around this fabric and this quilt. I used the same fabric for dressing the window. And I'm slowly but surely working on pillows.

Thursday, September 8, 2011

Quilting Bee Blocks

I got a smidge behind on blocks for the quilting bee while I was focused on getting Lil Hoot's new room ready for her move back in July.  (Series to come on that soon.)  I am not quite caught up and not quite complete with making blocks for our Virtual Quilting Bee.  I can't believe we have been doing this since last year!  We have all grown so much in both skills and confidence.  I can't wait to see the end results.


Flying Geese Bee Block

The Flying Geese Block.

Never would I have ever contemplated making this block. I mean, I think it's really cool, really cool, but I would not consider it within my abilities to make. Yet, here it is. It isn't perfect and I read the directions wrong so it's backwards from how it "should" be (geese flying clockwise) but my Queen Bee decided she liked them flying 'backwards'. It was interesting and I am so glad I learned to use freezer paper for piecing but I won't be making a quilt of them any time soon!

Dresden Plate Quilt Block - July
The Dresden Plate Block.

This block is intended for a quilt representing the 12 months of the year.  My month was July (in honor of my birthday).  I chose the Dresden plate design because it reminded me of both the sun and of fireworks.  I love the fabrics chosen by the Queen Bee and each one represents something different to me about July - greens for the lush grass, flowers for flowers and fireworks, the punch of yellow and orange inside pink for the sun and fireworks, blue for cool water and lazy days beside the pool/ocean, and the red is patriotic to me - celebrating Independence Day.  Oh yes, all those things are a bit deep for 'just a quilt block' but spending hours contemplating, cutting, sewing and creating...I thought about it all.

As for the design itself...I was pleasantly surprised at how easy the circle of points was to sew together, but attaching it to the background was a different story.  I used the instructions from the Sew Mama Sew Sew-Along when I made my practice block.  I didn't like their method for the middle circle, it looked too layered to me, so I just cut a circle and then ironed it on using Steam a Seam.  For attaching it to the background I simply placed, pinned and starting sewing with a small zig zag stitch.  It did not work well.  The pins let the whole thing shift around too easily and I ended up with a crinkle at the end.  It's not overly apparent but it was annoying.  In the future I will probably try some kind of temporary adhesive or a bit of Steam a Seam.


Wednesday, February 23, 2011

Free Motion Quilting

My interest in free-motion quilting began this past summer with this post at Craft Apple.  Then this fall, several of my friends learned the technique.  And when I saw this beautiful bib posted by my friend, Quirky Granola Girl, I just had to learn for myself.
I started by asking her (and a few others) some questions.  Then I watched a few tutorials - Craft AppleCrazy Mom Quilts, and (of course) Oh, Fransson!  I laughed when I saw the speed with which these women can quilt.  Rest assured, if you are like me, there is no need to go that fast.  And the first attempt, it probably won't be pretty, see? 

First Attempt
 But don't sweat it, because it will get better.  And if you have questions, there are tons of people out there willing to help.  Crafters/Knitters/Quilters - we're a generally friendly bunch.
Second Attempt
And then we you get up the nerve - start your first project.  For me, once I had the groove down, I had to keep going.  It takes me a while to warm-up before I can get going again.
First Project

Friday, February 18, 2011

Quilting Bee Blocks

As I mentioned before, I am currently part of a virtual quilting bee.  We started back in October and here is a walk through our blocks.  I am loving learning new techniques and taking them with me into my products.

January's Block - String Quilt

October's Block - String Quilt

November's Block - Anna's Design

Thursday, January 27, 2011

Quilt Block Tutorial - Disappearing 9 Patch Variation

Before I begin, allow me to caveat this tutorial by saying that I am not an experienced quilter.  I just started doing some quilting this Fall, encouraged by my friends who started a virtual quilting bee for our group.  My month is February and this is my block.  I wanted something perfect for using up scraps and stash fabric.

I started with the idea of a typical Disappearing 9 Patch but then made the following changes:

  1. Cut the following pieces from scraps and stash fabrics.  This block can also be made from a charm pack of fabric.
          16 - 2.5" x 2.5" squares
            5 - 4.5" x 4.5" squares

2.  Arrange squares to your liking.

 3.  Sew the 2.5" x 2.5" squares as shown.  Press seams open.

 4.  Sew the two rectangles together to form a 4.25" x 4.25" square.  Press seams open. 
*I don't use pins often, so to keep my corners lined up I start sewing approximately at the arrow in order to keep them lined up.  Then I flip the fabric and finish the seam.  That's probably cheating and many people would probably argue that pins would be faster, but it's the easiest way for me.  Even with pins I still end up with mismatched corners.

 5.  Your corner squares are complete.

 6.  Sew the 4.5" squares into three rows as shown.  Press seams open.

 7.  Sew all three rows together to form a complete square.  Press flat.

 8.  Cut apart along center lines. 

At this point a friend of mine pointed out how the cutting does not allow for seams when either sewing the blocks together again or when sashing into the quilt top.  So the symmetry is lost as noted in the picture below.


So here are two ways to create a symmetrical block.  First, by using smaller scraps to create individual blocks.

 1.  Cut the following:
       5 - 2.5" x 2.5" squares
       2 - 2.5" x 4.5" rectangles

 2.  Sew 2.5" squares as shown previously.  Then sew as shown above.  Press seams open.

 3.  Sew the two rows together as shown above.  Press flat.  You will now have a 6.5" x 6.5" square.

And now the second method for a symmetrical square using the Disappearing 9 Patch tutorial.

Rather than cutting 4.5" x 4.5" squares, cut the following:

2 - 4.5"W x 5"H (A)
2 - 5"H x 4.5"W (B)
1 - 5"H x 5"W (C)

Assemble the pieces in accordance with the chart above and sew according to the tutorial.  You will end with four 6.5" x 6.5" squares.

Tuesday, September 7, 2010

Quilting for the First Time

I'd never had much desire to quilt until recently. Most of my exposure has been to traditional quilting, which I admire and appreciate but it just doesn't fit my design aesthetic. Recently though my mind has been changing - modern fabrics in traditional quilts, traditional fabrics in modern quilts, quilting as art and art as quilting - the options are endless.

I am in love with this Color Wheel Quilt from Purl.


And a friend of mine just introduced me to this wonderful quilt from Tweedle Dee Designs on her Cut to Pieces blog:


There is even a very beautiful story behind this quilt - despair and hope and ultimately God's blessing and provision, which Angela was kind enough to share with us all. I have had visions of a few wall hangings for Lil Hoot's room and for play but nothing so beautiful as this quilt! Talk about inspiration!

So, at the urging of my online group of Ravelry Moms, I joined their Quilting Bee and took the plunge into the world of quilting. September is our first month and after catching the excitement from the other Moms, I did my first square this weekend. Here's my part of the quilt:


It's part of the Star Quilt-Along Week found on Crazy Mom Quilts. If you haven't stopped by her blog, I encourage you to do so. There is some awesome information for quilters on her site, but she is also more than just quilts and has a whole list of awesome tutorials.

So here I am, joining the world of quilters in a very cautious fashion, thankful for all the wonderful bloggers out there who make learning quilting more accessible than ever before!

And now, I'm off to work on a super-fun project that I will hopefully unviel soon!