Showing posts with label tutorial. Show all posts

Thursday, January 27, 2011

Quilt Block Tutorial - Disappearing 9 Patch Variation

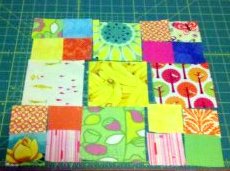
Before I begin, allow me to caveat this tutorial by saying that I am not an experienced quilter.  I just started doing some quilting this Fall, encouraged by my friends who started a virtual quilting bee for our group.  My month is February and this is my block.  I wanted something perfect for using up scraps and stash fabric.

I started with the idea of a typical Disappearing 9 Patch but then made the following changes:

  1. Cut the following pieces from scraps and stash fabrics.  This block can also be made from a charm pack of fabric.
          16 - 2.5" x 2.5" squares
            5 - 4.5" x 4.5" squares

2.  Arrange squares to your liking.

 3.  Sew the 2.5" x 2.5" squares as shown.  Press seams open.

 4.  Sew the two rectangles together to form a 4.25" x 4.25" square.  Press seams open. 
*I don't use pins often, so to keep my corners lined up I start sewing approximately at the arrow in order to keep them lined up.  Then I flip the fabric and finish the seam.  That's probably cheating and many people would probably argue that pins would be faster, but it's the easiest way for me.  Even with pins I still end up with mismatched corners.

 5.  Your corner squares are complete.

 6.  Sew the 4.5" squares into three rows as shown.  Press seams open.

 7.  Sew all three rows together to form a complete square.  Press flat.

 8.  Cut apart along center lines. 

At this point a friend of mine pointed out how the cutting does not allow for seams when either sewing the blocks together again or when sashing into the quilt top.  So the symmetry is lost as noted in the picture below.


So here are two ways to create a symmetrical block.  First, by using smaller scraps to create individual blocks.

 1.  Cut the following:
       5 - 2.5" x 2.5" squares
       2 - 2.5" x 4.5" rectangles

 2.  Sew 2.5" squares as shown previously.  Then sew as shown above.  Press seams open.

 3.  Sew the two rows together as shown above.  Press flat.  You will now have a 6.5" x 6.5" square.

And now the second method for a symmetrical square using the Disappearing 9 Patch tutorial.

Rather than cutting 4.5" x 4.5" squares, cut the following:

2 - 4.5"W x 5"H (A)
2 - 5"H x 4.5"W (B)
1 - 5"H x 5"W (C)

Assemble the pieces in accordance with the chart above and sew according to the tutorial.  You will end with four 6.5" x 6.5" squares.

Wednesday, September 15, 2010

Lady Bug Costume/Backpack Tutorial

Lil' Hoot LOVES purses, diaper bags, back packs, lunch bags - anything with a handle. I went to sew up her Halloween costume - a lady bug - and discovered it could easily be made into a pillow-style "back pack" as well. In honor of Elsie Marley's Kid Clothes Challenge Week, I share with you my process. The measurements I use gave me a 12-24M size. You can certainly enlarge it for an older toddler and if you need any help doing so, just email me.


Tune in for a $5 version of the Lady Bug costume and a Giveaway.

Materials

1/2 yd. red fleece
12" black felt square
1/3 yd. sew-in interfacing
1 yd. - 1" black mesh
2 - 1" black strap adjusters
10" zipper
12" plate (or circle template)
16" plate (or circle template)
lids/circle templates of various sizes
chalk/marking pen
straight pins
measuring tape
scissors

1. Using circle templates (I use plates) and chalk, mark two circles on the red fleece and cut.

2. Take the 16" circle, fold it in half. Stitch 1/4" away from the folded edge. Open sewn circle. This seam creates the divided wings of the lady bug.

3. Creating the black dots. I wanted dots of different sizes so I simply looked around the house and chose lids that were the sizes I wanted. Trace the lids (or other circle templates) on the felt and cut.

4. Arrange, pin and sew on black felt dots. Sew close to the outer edge of the circle.

Tip for sewing circles.
Go slowly and stop with the needle down to raise, turn and position the circle as you sew. Keep your eye on the outer edge and stop to turn the curves rather than pulling the fleece, which will stretch if pulled.

5. Install zipper. I used the tutorial found on the Sew Mama Sew blog - Zippered Pocket Tutorial.

6. Determine the position of your straps. Ideally you can measure the child from armpit to armpit to determine placement. However, if you cannot then I suggest you use a well-fitting article of their clothing and measure from there. I placed the top of the straps approximately 7" apart and 3" from the top of the circle. I placed the lower strap markings 3" below the top markings.

7. Make straps. Overcast all cut ends of the black mesh. Slip the black mesh through the strap adjuster as shown. I do not cut the opposite end until after I complete step #8.

8. Fold over the end 1/2" and stitch closed as shown.

9. Cut the black mesh approximately 1" from folded, sewn seam. Overcast the raw edge with a zig zag stitch. Fold over 1/2" and sew closed.

10. Pin the strap in place as shown on the bottom marking. Be sure to place sew-in interfacing underneath before sewing. Sew strap to fleece, double stitch for added strength.

11. Cut two 13" lengths of black mesh. Overcast the raw edge with a zig zag stitch. Fold one end up by 1/2", the other end under by 1/2" and sew each end closed.


12. Place top strap on top marking with the folded edge facing down.

13. Pin the top strap in place and sew. Be sure to place sew-in interfacing underneath before sewing. Sew strap to fleece, double stitch for added strength.

14. Feed strap through the strap adjuster as shown. Fold strap end under 1/2" and sew closed to enclose raw edge.

15. Repeat steps 7-14 (except #11) for the second strap.

16. Open the zipper slightly (so you can pull the piece through once sewn together.) Place completed 12" circle on top of 16" circle, centers aligned, right sides facing.

17. Pin in place starting with the 4 "corners". I designed the top larger than the bottom on purpose, which means that it will take some scrunching and stretching to fit to the lower.


18. Pins are your friend! Just keep pinning and stretching the fleece to fit, it will create a domed shape and more room for stuffing once completed.

19. Stitch around the circle. Flip right side out, check your seams. If everything looks good, stitch around the circle a second time for added strength.

20. Flip right sides out, stuff with a pillow form, make your own circle pillow, or let your child stuff it how he/she chooses! Pair with black pants and shirt for a Halloween outfit. Tune in next week for a $5 version of the Lady Bug costume and how to make an antenna headband.

Tuesday, June 29, 2010

Crayon Bucket Tutorial

As promised - Tutorial for making a Crayon Bucket. Enter the give away tomorrow to win your own Crayon Bucket or Crayon Roll.

1. Gather supplies:
  • Scraps of Fabric
  • Scraps of Ribbon
  • Small Canister with Lid (~ 4"W x 4.5"H)
  • Thread
  • Scissors
  • Tape Measure
  • Fabric Marking Pen
  • Straight Pins
  • Iron
  • Cutting Mat*
  • Rotary Cutter*
  • Quilting Ruler*
*Optional, but makes it slightly easier/faster.

2. Place canister lid on scrap of fabric. Trace around the lid, leaning the marker away from the lid so it creates a larger circle.

3. Place canister within the circle drawn around the lid. Trace around the canister, keeping marker tight to the base. The difference between the two lines is the seam allowance, mine measures approximately 1/4".


4. Next measure the canister's circumference. The non-mathematical way - wrap a tape measure around it and add an inch for seam allowance.

Or do the math (which usually has a smaller margin of error and makes the pieces fit better, thus it is easier to sew). Measure the diameter of the inner circle (base of the canister) and multiple it by pi (3.14) - or even simpler - use this tool. My diameter measures 4 1/8" (4.125) so my circumference is 13" (12.959...).


5. Measure the height of the can and add 1 1/4" for seam allowance. My can is 4.5", so the complete dimensions for my fabric rectangle are 5 3/4"H x 14"L.


6. Cut the fabric. Make certain to cut along the outside circle line. Then, using a mat, ruler and rotary cutter, cut the rectangle. Or just measure and mark out the rectangle then cut by hand.

7. Fold the rectangle lengthwise, right sides together and stitch the raw edges together with a 1/2" seam allowance. Slip it over the canister - adjust the seam allowance and re-stitch if it needs to be tighter or looser . After assuring the right fit, do a zig zag stitch for added seam strength. Iron hem closed.


8. Pin the circle to the bottom of the rectangle, right sides facing. Stitch only slightly outside the inner circle. Try the fit on the canister, make any adjustments, then zig zag stitch along the seam.


9. With the fabric still on the canister, draw a line around the top using the lip as a guide. Remove fabric from canister. Fold over a 1/2" seam allowance, matching to the drawn line, then iron. Fold over another 1/2" (so the top of the fold is now even with the drawn, but now covered, line) and iron flat. Turn right side out and top stitch around the bottom edge of the fold.


10. Cut a 12" length of ribbon. Fold over a 1/2" seam allowance, iron. Fold over another 1/2" and iron flat, depending on the ribbon it may need to be pinned flat.

11. Fold the cover in half with the hem at the back, place the ribbon in the middle of this section on each side and pin in place. Stitch ribbon to the fabric cover. I use a satin stitch but a straight stitch forward and reverse will also secure the ribbon nicely.


12. Trim any loose threads then slip on the cover, add crayons, pop on the lid and hand to your little one to enjoy!


*All tutorials for personal use only.