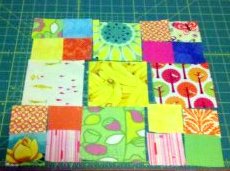
Before I begin, allow me to caveat this tutorial by saying that I am not an experienced quilter. I just started doing some quilting this Fall, encouraged by my friends who started a virtual quilting bee for our group. My month is February and this is my block. I wanted something perfect for using up scraps and stash fabric.
I started with the idea of a typical Disappearing 9 Patch but then made the following changes:
Cut the following pieces from scraps and stash fabrics. This block can also be made from a charm pack of fabric.
16 - 2.5" x 2.5" squares
5 - 4.5" x 4.5" squares
2. Arrange squares to your liking.
3. Sew the 2.5" x 2.5" squares as shown. Press seams open.
4. Sew the two rectangles together to form a 4.25" x 4.25" square. Press seams open.
*I don't use pins often, so to keep my corners lined up I start sewing approximately at the arrow in order to keep them lined up. Then I flip the fabric and finish the seam. That's probably cheating and many people would probably argue that pins would be faster, but it's the easiest way for me. Even with pins I still end up with mismatched corners.
5. Your corner squares are complete.
6. Sew the 4.5" squares into three rows as shown. Press seams open.
7. Sew all three rows together to form a complete square. Press flat.
8. Cut apart along center lines.
At this point a friend of mine pointed out how the cutting does not allow for seams when either sewing the blocks together again or when sashing into the quilt top. So the symmetry is lost as noted in the picture below.
So here are two ways to create a symmetrical block. First, by using smaller scraps to create individual blocks.
1. Cut the following:
5 - 2.5" x 2.5" squares
2 - 2.5" x 4.5" rectangles
2. Sew 2.5" squares as shown previously. Then sew as shown above. Press seams open.
3. Sew the two rows together as shown above. Press flat. You will now have a 6.5" x 6.5" square.
And now the second method for a symmetrical square using the Disappearing 9 Patch tutorial.
Rather than cutting 4.5" x 4.5" squares, cut the following:
2 - 4.5"W x 5"H (A)
2 - 5"H x 4.5"W (B)
1 - 5"H x 5"W (C)
Assemble the pieces in accordance with the chart above and sew according to the tutorial. You will end with four 6.5" x 6.5" squares.


